Showing posts with label Food. Show all posts

Wednesday, July 18, 2012

Taste of France

Last Saturday, in honor of Bastille Day, I decided to make macarons.  Over a year ago I took a class at Sur la Table to learn how to make the delicate French confection and let me tell you, it is much harder than it looks.  It's a time consuming process but with some patience and attention to detail, you may not have the most perfect looking cookie, but it should be delicious!

My recommendations:
Before you attempt to make these, you will need a kitchen scale and some silpats (silicone mats that are used for baking and can be bought at any cooking supply store).  The kitchen scale is necessary because a lot of these measurements have to be exact and are in ounces.  Baking is scientific to begin with but macarons are especially temperamental.  Also, it is very handy to have a stand mixer.  Macarons are basically meringue cookies with almond flour mixed in and to make meringue, you have to beat egg whites for a long time.  Once I felt like my arm was going to fall off before I had stiff glossy peaks.  So a stand mixer can alleviate this and help immensely.

Cassis Macarons
Ingredients:

  • 7 ounces powdered sugar
  • 4 ounces almond flour or meal
  • 4 large (4 ounces) egg whites, room temperature
  • 1 1/2 teaspon creme de cassis (Note: different flavors of macarons can be created by changing this ingredient to different flavors, ie. vanilla extract, coffee extract, etc.)
  • 3 ounces granulated sugar
  • purple food coloring
Instructions
  • Preheat oven to 375 degrees.  Line baking sheets with silpat silicone mats 
  • Pulse one third of the powdered sugar and all the almond flour in a food processor to form a fine powder.  Sift sugar mixture 2 times.  Sift remaining powdered sugar 2 times.  Combine almond flour mixture and remaining powdered sugar.  Set aside.  (It's important that this mixture is as fine as possible to create a smooth cookie)

  • In the bowl of a stand mixer fitted with a whisk attachment, whisk egg whites and creme de cassis on medium speed until foamy.  Gradually add granulated sugar.  Once all sugar is incorporated, scraped down sides of the bowl, add food coloring and increase speed to high, whisking until stiff, firm glossy peaks form.  

  • Hint: use a lot of food coloring.  When the cookies bake they will become much lighter, so the darker the better.  Also, if you can't find purple food coloring create it using red and blue... a color combo I forgot temporarily, adding green before I remembered it was red that helped make blue purple... embarrassing.


  • The way you know that the eggs are stiff enough is that you should be able to dip a spatula into the mixer and turn it upside-down without the meringue moving at all.  


  • Part of making macarons involves three steps: macaronnage, macaronner and pied.  The macaronnage step is the technique of mixing flour and meringue to make macarons.  For this step, sift almond flour mixture one-third at a time over the egg white mixure and fold using a large spatula until mixture is smooth and shiny.  Once all the almond flour mixture is incorporated, check for the correct consistency - the batter should be nicely firm and drip slowly from the spatula (macaronner).  

  • Transfer the batter to a pastry bag fitted with a 1/2 inch plain round tip (#12) and pipe 1 1/3 inch rouncs onto baking sheets.  (Tip:  I did not have a bag the last time I made these, but was able to make a makeshift one from a plastic bag, cutting a hole in the corner.  Also, this part gets very messy.  Be prepared.) 

  • Try to make sure that your rounds are roughly the same size, so that once you add in the cream, they will fit together to form a cookie.  Also, when squeezing the bag, try to keep the tip in place so that the batter is forced to spill out to the sides.  This will help keep the cookie flatter.  
I have papers with identical circles printed to help guide me on making equal sized cookies
  • Tap the bottom of each sheet on a flat surface to release trapped air.  Let stand at room temperature for 15-30 minutes.  Check for slight crust to form - macarons should not stick to your finger when lightly touched.

  • Stack the baking sheet onto another before baking.  Bake one sheet at a time, rotating halfway through, until macarons are crisp and firm, about 10-15 minutes.  If the macarons are still soft inside, lower oven to 300 degrees and cover with aluminum foil before baking for a few more minutes.  
  • Let macarons cool on sheets for 2 to 3 minutes and transfer to a wire rack to cool completely before filling.  
I should have used more food coloring, even the darkest batter can bake light

Rum Cream Filling

This is one of my favorite fillings because in my opinion it goes with almost any flavor.  But if you have a filling or frosting you prefer, go ahead and use it to fill your cookies. 

Ingredients:
  • 2 large egg whites, room temperature
  • 4 ounces granulated sugar
  • 6 ounces (3/4 stick) unsalted butter, softened, cut into 1 inch pieces
  • 1 tablespoon rum
Instructions:
  • Place egg whites and sugar in a heatproof electric mixer bowl, set over a medium saucepot of simmering water.  Whisk until sugar dissolves and mixture registers 141 degrees on an instant read thermometer
  • Remove bowl from heat and attach to a hand mixer fitted with a whisk attachment.  Whisk on medium speed for 5 minutes.  Increase speed to medium-high and whisk until stiff, glossy peaks form, about 6 minutes.  Reduce speed to low and add butter, 1 piece at a time, whisking well after each addition.  Once all butter is incorporated, return to medium-high speed and whisk for a few minutes until fluffy.
  • Switch to a paddle attachment.  With mixer on low, add rum.  Use rum cream immediately or cover and refrigerate.  Pipe between two macarons.  

Recipes from Sur la Table

Monday, July 9, 2012

Southern Fried Fourth

Last week for the 4th my friends and I made way too much good food which lured us into an early food coma.  For my part, I made buttermilk fried chicken.  While the thought of frying chicken can seem intimidating, the recipe I use is actually very easy to follow and produces perfectly moist chicken every time.

The most important part of the chicken frying process is brining.  Brining involves soaking meat in water with salt in order to marinate it.  For buttermilk fried chicken this means soaking raw chicken in buttermilk and kosher salt.  It's suggested to brine your chicken for 2-4 hours, but I like do it for as long as possible.  The longer it's brining, the more flavor you'll get.  I brine the night before, but even the morning of would be good.

Ingredients

  • 3 cups of buttermilk
  • 1/3 cup of kosher salt
  • 2 tablespoons sugar
  • 2 1/2 to 3 pounds meaty chicken pieces
  • 2 cups of all-purpose flour
  • 1/4 teaspoon salt
  • 1/4 teaspoon black pepper
  • 3/4 cup buttermilk
  • vegetable oil
  • 1 teaspoon cayenne pepper (I add this if I want a to make a spicy batch of chicken)

Instructions:
  • For brine, in a resealable plastic bag, combine 3 cups of buttermilk with kosher salt and sugar.  Add all chicken pieces to the brine and seal bag.  Chill for 2 to 4 hours.  When ready to fry, remove from brine, drain chicken and pat dry with paper towels.  Discard brine.

  • In a large bowl combine flour, salt and pepper (and cayenne pepper if desired).  Place the 3/4 cup of buttermilk in a shallow dish.  Coat chicken with flour mixture then dip in buttermilk before coating again with flour mixture.  

  • Meanwhile, in a deep, heavy pot or deep-fat fryer, heat 1 1/2 inches of vegetable oil to 350 degrees.  Using tongs, carefully add a few pieces of chicken to the hot oil.  Fry chicken for 12 to 15 minutes or until chicken is no longer pink (170 degrees for breast, 180 degrees for thighs and drumsticks) and coating is golden, turning once.  Drain on paper towels.  If desired, keep fired chicken warm in a preheated 300 degree oven while frying remaining chicken pieces.  Do not fill the pot up too full with chicken.  Cook in batches.


Southern Fried Chicken! So delicious!


Recipe courtesy of Better Homes and Gardens New CookBook 15th Edition

Friday, May 25, 2012

Things I Love ... Coffee and Croissants

It has ended up being kind of a crazy week.  With a final exam and a final project coming up next week I'm doing lots of work balanced with lots of fun outings with friends.  So today I wanted to bring you one of the simpler pleasures in life that I love... coffee and croissants for breakfast.

I will actually eat croissants any time of the day, but this is always such a great way to start a morning.  It makes me think of loungey mornings in Paris... or anywhere in Europe.  And makes me wish I lived in France and could easily walk down to a bakery or a sidewalk cafe to enjoy such a decadent morning treat.  Nothing beats a fresh, flakey croissant and a hot cup of cafe au lait.  Especially when sipped on a Parisian patio.

Maybe I'll have to visit Whole Foods this weekend and get some croissants and take a minute to just slow down.  It's not quite the same, but it'll do in a pinch.

Happy Friday!


(images via 1, 2, 3, 4, 5)

Friday, May 11, 2012

Things I Love ... Ladurée

If you know me at all, you've probably heard me rave on and on about how much I love Ladurée.

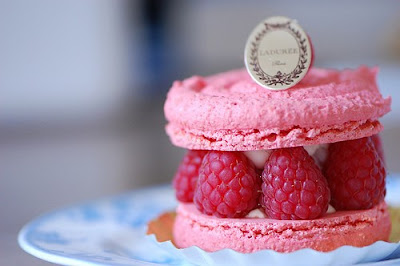
Ladurée is a French pastry shop that has been around since the late 1800s.  Some of the locations just serve treats over the counter and others are larger and incorporate tea rooms.  But the greatest treasure at Ladurée is "le macaron."  The macaron is very different from the coconut cookies people usually associate with the name.  The French macaron is a sandwich-like cookie made by combining two almond-meringue cookies around cream filling.  Flavors range from traditional vanilla, chocolate and coffee to colorful rose, cassis (which is blackberry violet), orange blossom and pistachio.  Traditional packaging is shades of green, pink and purple pastels with gold detail.

Sadly Ladurée is largely based in Europe and some in the Middle East.  There is only one in the U.S. and it's on Madison Avenue in New York.  Although it's closer than a quick trip to Paris, it's still quite a trip to get a giant box of macarons (which is what I usually do so I'm stocked for at least a week or so).

Enjoy some delectable photos of one of the things I love...


Outside Ladurée in New York this past December!

For more about Ladurée, and visit the New York store at 864 Madison Ave. New York, NY 10021, 646-558-3157
(all images via Pinterest)


Monday, May 7, 2012

Derby Days

In the midst of celebrating Cinco de Mayo on Saturday, I also celebrated the Kentucky Derby.  Before heading out to Chuy's I stopped by a friends for mint juleps and to watch the races.  I brought my favorite bourbon treat (my favorite hard liquor, btdub) Bourbon Balls.

I got the recipe from the Williams Sonoma Baking cookbook.  These bite-sized treats pack a real punch because they contain a hefty serving of bourbon and don't bake, making each bite equivalent to the sip of a cocktail.

Here's how I made Bourbon Balls, eat responsibly.


Ingredients: 
  • 1 box vanilla wafers
  • 6 oz. semisweet chocolate, finely chopped (I use chocolate chips)
  • 1/2 cup firmly packed light brown sugar
  • 1/4 cup light corn syrup (I use Karo syrup)
  • 1/3 cup bourbon
  • Pinch of salt
  • 2 cups pecans, lightly toasted and finely chopped 
*I use this recipe without pecans, but it's totally up to your preference.  I use powdered sugar  to dust the outside instead.

Instructions: 
  • In a food processor, pulse the vanilla wafers into a fine crumb.  You can also do this by putting the cookies in a plastic bag and rolling with a rolling pin.  

  • In a double broiler, melt the chocolate.  You can create a double broiler by placing a glass bowl over a saucepan with some water in it.  Make sure the bowl does not touch the water and do not bring the water to a boil but simmer.  It will take a while for the chocolate to start to melt, but once it does keep stirring so as not to burn it.  You can do this in the microwave as well, but it's easier to accidentally burn the chocolate that way.  


  • Add the melted chocolate to the vanilla wafers and add in brown sugar, corn syrup, bourbon and salt.  Stir until blended together.  If you want to add pecans, here add half to the mixture.  

  • Spread wax paper out and sprinkle powdered sugar (or pecans if you prefer).  Roll the batter with your hands (slightly dampened) into 1 inch balls.  Then roll in either powdered sugar or pecans.  Arrange in a container in layers with wax paper and refrigerate for 24 hours.  Serve at room temperature.  You can keep the balls in the fridge for 2 weeks or freeze and keep good for 1 month.  

Recipe via Williams Sonoma